I have a confession to make. I never actually printed out any of my landscape photos, framed it, and hung it on my wall before. So I embarked on a little project with a goal to do just that.
Picking the Photo
In the collection of landscape photos I took over the years (you can see some of them at the gallery), I was looking to pick out one that's unique and has that, dare I say, fine art quality, worthy of being hung prominently on a wall.1 There were a couple of candidates, but I landed on this one (still a camera-processed JPEG):
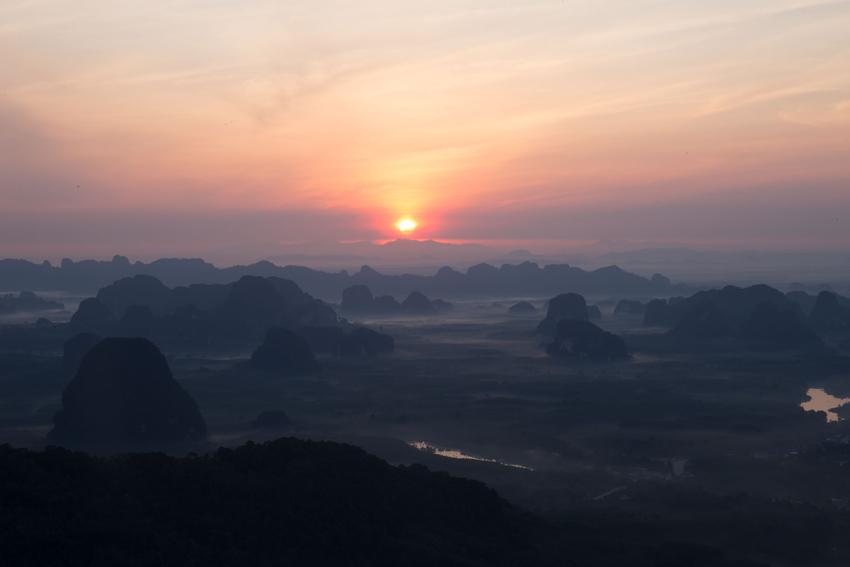
This photo was taken back in summer of 2015 in Krabi, Thailand. To get this shot, I had to get up early enough to be at the trailhead by 4 in the morning, then hike in the dark for 2.5 hours on a mostly unmarked trail for about 4 km (2.5 mi) with around 500 m (1,600 ft) elevation gain up to this relatively unknown viewpoint to catch the sunrise. The effort it took to capture this made it so gratifying, and that's part of the reason why I chose this photo.
Re-processing the Photo
Back when I first took this photo, I already did the post-processing and uploaded it online. Though looking at that photo now 4 years later, I don't really like how I had done it; it felt a bit too cool for my liking. So I took another shot at it, and this time with proper preparation for prints.

Printing
After some research, I settled on ordering the print from Mpix. I wanted the highest quality they had to offer so I went with a 10"x20" Giclée print on their matte "Fine Art Photographic" paper. I considered doing 12"x24" but with a mat board and a frame, I figured it would be too large.
Framing
I had absolutely no idea how to even start with this. My initial plan was to just have it framed by Mpix with the print order, but unfortunately it's not very customizable and they can get quite pricey. Researching for some local frame shops revealed that they can also get expensive quick and the turnaround time could be a few weeks. In the end, a couple of guides online convinced me to go with the semi-DIY route. So I ordered the frame kit from Frame Destination.
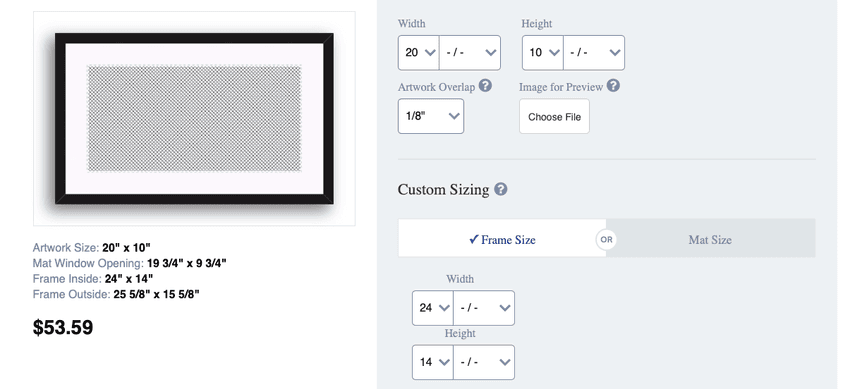
The kit is a custom-sized 14"x24" Black Wood Frame with a 2 1/8" mat board. For the glazing, I picked the acrylic over glass as I wanted to keep this relatively light. It's also more optically pure than glass and shatter resistant.
At the risk of looking super pompous, I signed the print before framing it. I went back and forth on this for a while because, for starters, I don't really have an actual signature and I thought maybe this print isn't of fine art quality enough that it warrants a signature. Plus this project was for my own enjoyment, it's not like I was planning to sell it at an art show or anything. But in the end, after some reading around and stumbling upon this video, I went ahead and signed it. This acid-free Decocolor gold paint marker worked out nicely.
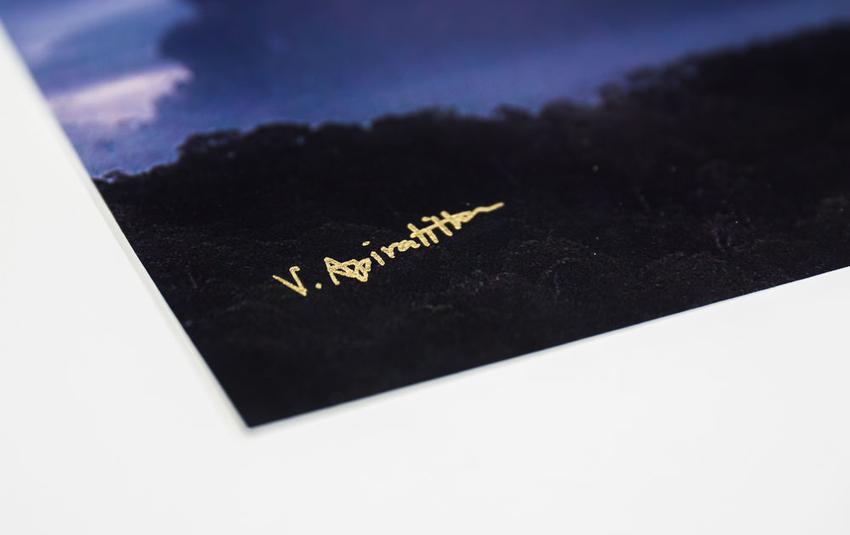 Of course, even after pages of practice, not only did I not sign it as nicely as I'd like, I also didn't even space it properly from the corner. Oh well...
When it came time to actually put it all together, I would soon learn that I should have taken that B&H guide more seriously — especially around how acrylic can become statically charged — and gotten myself some anti-static gloves or cloths. Being in a small-ish apartment with two cats, I could not believe how much cat hair and dust particles are floating around in the apartment which, to my dismay, all chose to hang out on the acrylic. After frustratingly fiddling around for an hour, feeling utterly defeated trying to get all the cat hair off of the acrylic, the frame was ready to be assembled.
Using this linen hinging tape, I did the T-hinge to mount the print to the foam board, and the foam board to the mat board. Everything had to be in the right order: first the empty frame, then the acrylic, the mat board, the print, and the foam core. Securing all the frame points, then attaching the wire to the frame, and it was completed. Lastly with a basic picture hanging kit, it is now proudly displayed on the wall.
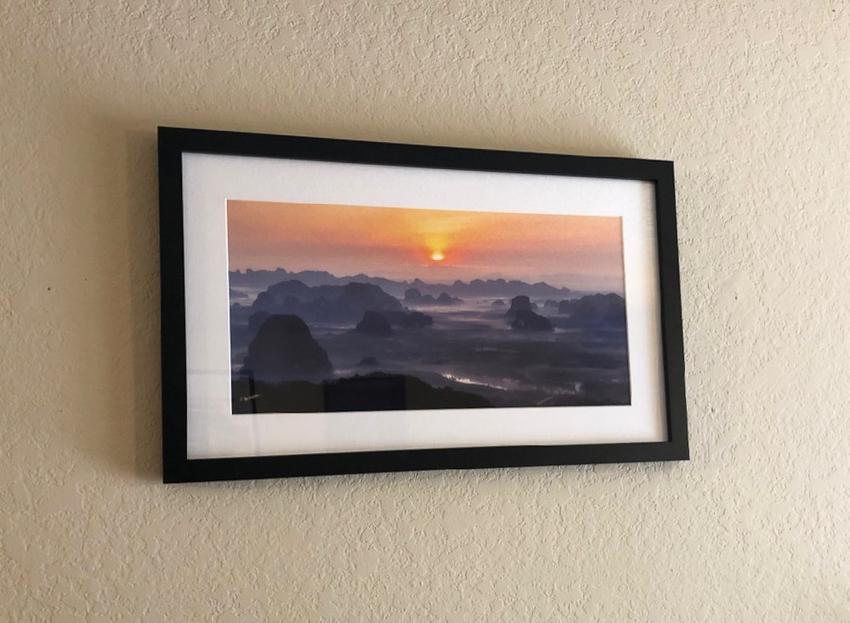
It finally feels finished that this photograph takes up physical space in the world and is no longer just 1s and 0s on a hard drive or in the cloud somewhere to only be double-tapped on and forgotten about after a couple of seconds of being looked at. If you haven't printed out your favorite photos, I highly recommend it.
-
Obviously a sunrise shot like this isn't by any means unique but I'd say given the location which is relatively unknown to the wider world, it's unique enough for my purpose. ↩︎